
 I sort of cringe at calling this a "tutorial." It's more like a "Hey, look what I did, even though I'm not super happy with it, this is how I did it and do you have any ideas to make it better?" "Tutorial" is just slightly catchier . . . misleading, but catchier.
 Anyway, I saw these candy wrapper headbands (much better-looking ones, mind you) on Etsy and I thought they were adorable. I have 4 little nieces on my side of the family so I knew I wanted to make them some for Christmas. I couldn't find a good tutorial online so I sort of guessed as to how it's done! If you like the headbands but don't want to go to all this trouble, check out this Etsy shop . . . the headbands look amazing and perfect.
So, let's get started! You'll need:
1 plastic headband, at least 1 inch wide
candy wrappers (enough to cover roughly 12 inches)*
scratch paper
pencil
iron-on vinyl
iron
Sharpie marker
sewing machine
thread
hot glue gun & hot glue sticks
*I highly recommend choosing a paper-based wrapper (M&Ms, Skittles, etc.) as opposed to one that is more plastic and lined with foil (most chocolate bars are wrapped in this kind of wrapper). I used the foil-lined wrappers and as you can see (with the Hershey's and KitKat headbands) they wrinkled when I ironed them. When I looked at the Etsy shop that sells these, I noticed 99.9% of the headbands were NOT made from chocolate wrappers. My mistake! Reese's peanut butter cup wrappers are plastic but do not have foil on the inside so they held up much better under heat. I actually had to redo the KitKat one (you can see in the picture where my niece is wearing it that it's different) and used a King Size KitKat . . . those don't use foil either and worked better. To try to cut back on the wrinkling, I minimized the ironing time (I followed the vinyl instructions which was another mistake!) If anyone has any other suggestions, please comment and let me know!
1. Take your headband and starting with one end, stencil the outline of the headband with a pencil (this will be longer than a regular sheet of paper, so tape 2 sheets together). Leaving a 1/2 inch border around the stencil, cut it out.
 2. Carefully open the candy bars. I snipped one end open with scissors and using the flap down the middle, peeled it open. Once the wrappers are completely open, clean (or lick--I don't judge) all the candy remnants out. Using the headband template you just cut out, line up your wrappers until you have enough to cover the entire headband. You may need to cut part of a wrapper off in order to fill the entire template. Make sure the logo is prominent when you make your design.
 3. Pull out your iron-on vinyl. Using the paper template, cut out two separate templates (the grid-printed side is paper and you can trace around the template to make cutting it out easier). Peel the paper side off of the vinyl. Place the vinyl "sticky" (it's really not that sticky) side up. Now place your wrappers face down on the vinyl. If you have a brayer, roll it over the wrappers . . . this will help flatten the wrappers out. If not, press the wrappers down with your fingers. The vinyl is very forgiving, so if you need to move a wrapper, you can do so easily. When you're happy with the placement of the wrappers, peel the paper from the second sheet of vinyl and place it on the back of the wrappers. Smooth it out again with a brayer or your fingers.
 When you're happy with how it looks, trim the excess wrapper around the edges.
 4. Now it's time to iron. Set your iron to NO STEAM and on a medium (wool) setting. Using an old pillowcase or sheet to protect your ironing board, place the vinyl on the board. Cover the wrappers and vinyl with the paper from the two vinyl templates you cut out. Place heated iron on the vinyl for no more than 2 seconds (no, I'm not kidding). Do the same on the other end until the entire piece, wrappers and vinyl, are fused. If they are fused, do NOT iron the back. Only iron the back if you think it needs more heat . . . and only do iron for a second or two at a time or it will crinkle and be ruined.
 5. When your vinyl is fused and cooled, line it up with your headband. Just like you did for the template in the beginning, trace the outline of your headband on the back of your vinyl using a Sharpie or permanent marker. Following that outline, carefully cut out your vinyl so it lines up with the headband.
 6. This step is optional but adds a nice touch. If you're good with a sewing machine, add a small zigzag stitch to the outside of the vinyl making sure you don't go over the edge. (I would use the trimmings from the vinyl first to see what tension to set your machine.)
 7. Final step! Set your glue gun to it's lowest setting. The heat from the glue gun can warp and wrinkle the vinyl, so apply glue to the edges of the headband only to avoid major wrinkles. Snip off any excess vinyl that may be hanging over the edge.
  Poof! You're done. It's a pretty fast project once you get the hang of using the vinyl. Those of you who are more versed in headband and hairbow crafting, please give me any tips or pointers!
 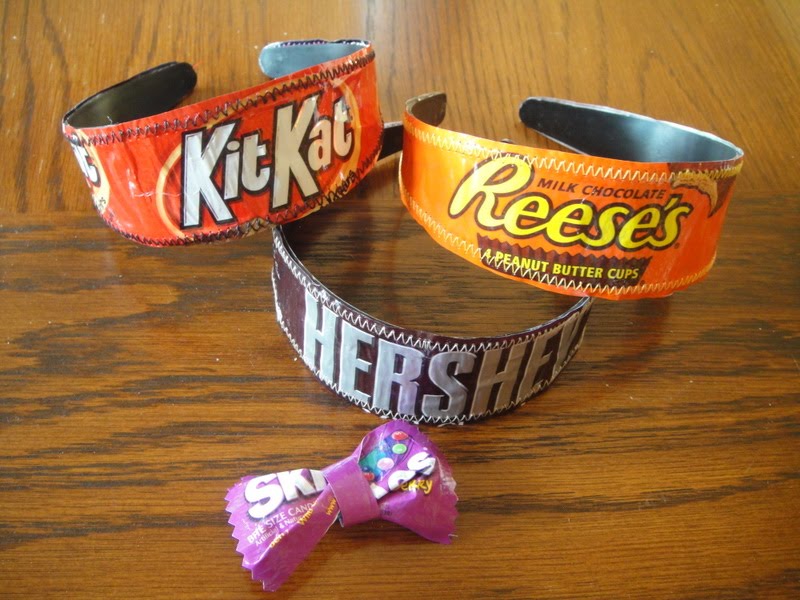 My nieces LOVED these headbands and went absolutely crazy over them. It also helped that I gave them the candy bar that inspired each of their looks. ; ) You'll see a little Skittles hairbow that I made for my little 2 year old niece . . . that's a whole different tutorial! If you guys are interested in that one, let me know and I'll write it up.
7 comments:
Fantastic tutorial! Ah, the joy of attempting something new. I find my creations NEVER come out the way I want the first time. So I call them "prototypes" and they become special to me. Then (hopefully) I try again. Your headbands look great and I didn't notice the wrinkling until you mentioned it - it doesn't look bad at all.
By the way, I'm featuring one of your terrific bags in an Etsy Upcyclers team treasury which I will be posting as soon as my husband gets off the good computer. :)
Gena (a.k.a. Verdant Violet)
How fun!
So you are using Clear Iron on vinyl? Where did you gt that.?
I got the vinyl at Hobby Lobby. It was with their sewing notions. I think JoAnn or Hancock Fabrics would carry it also.
How awesome!! I bought 2 candy wrapper headbands on vacation forv $15 each and swore that I would figure out how to make them! I usually make soap or scarves for Xmas! I think this year I will make headbands my project! I have NEVER used a sewing machine before..nor do I have one! What kind do you suggest for a beginner??
Melanie ♥
Melanie - I use a $88 Walmart special! LOL. It's a Brother LX 2125 I think. It's lasted several years and it's easy to use. Check out Amazon and read reviews for the highest rated sewing machines and that should give you a good idea of what to get. :)
How fantastic is this!!! I have a supply of iron-on vinyl-- guess I will have to go get some candy!! Thanks for this tutorial!!!
handbag heaven
Post a Comment